Followers

Wednesday, July 1, 2015

Nautical Domino Book

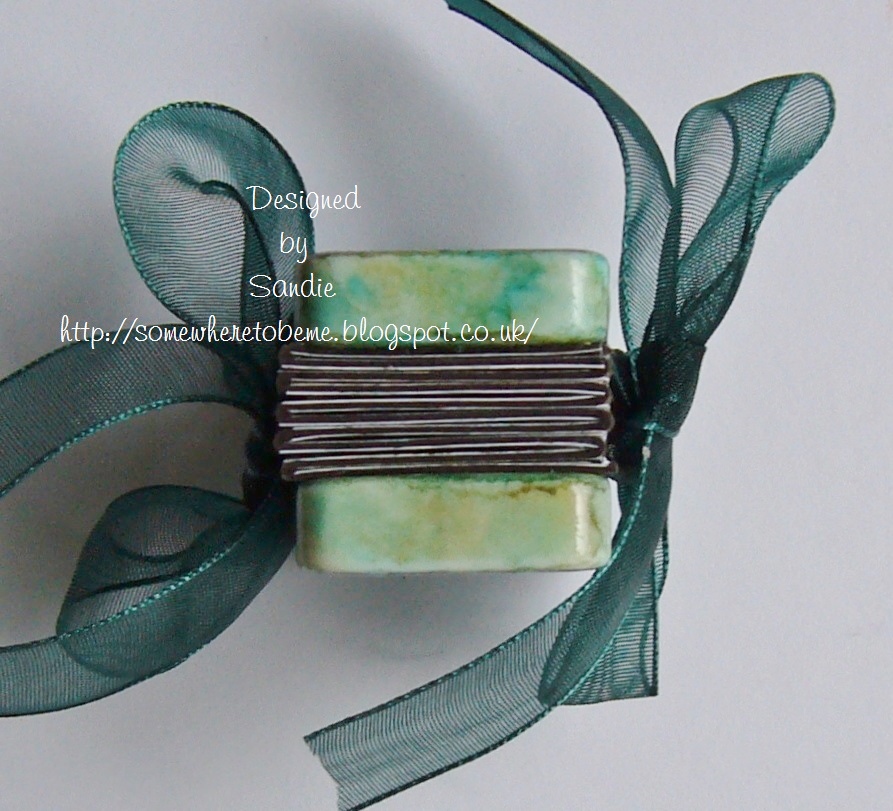
I have always loved the beautiful Altered Dominoes that I see over on Pinterest, so I went and bought some and some alcohol inks and created my very first Domino Book for my design team project over at Rhedd's Creative Spirit


I coloured the dominoes with the alcohol inks, then stamped sections of my nautical stamp, also stamping along the edges.
I used spray and shine over both dominoes, which bought the colour of the inks up beautifully.


Using black card I folded ( concertina style) the card enough to hold all the images I wanted to use.


I then added all the images to both sides of the book pages


To finish the book I adhered the book to the dominoes, ensuring that there was enough ribbon for the ties.
I'm really happy at how my first Domino Book looked when it was finished....so I am eager to create more, maybe a bit more lavish,lol...the possibilities are endless.
So if you like altered art and fancy a challenge you can find July's challenge here at...


Pretty Chest of Drawers

The July challenge has just started over at Altered Eclectics...such a delight to be on the design team over there, such a talented bunch of teamies, so do pop over for a lookie..


My Dt project this month is this little chest of drawers....made from mdf, just perfect to alter.


After sealing the mdf with gesso,I then painted it twice in cream acrylic paint, leaving it to dry overnight.


I sorted through my scrap paper box for some matching papers and I found enough to cover the chest completely, I love these, they are so pretty.
I glued the knobs back on to the drawers.


To decorate I used a small picture frame and added some mirri card to make a mirror.
Then I sorted through some beads so I could make the perfume bottles....I found a lovely pearly glass barrel bead that was perfect to make a vase for the rose.
Added some string pearls,some silver chain and a key...and that fab blingy letter "B"
Hope you pop on over and join in with our challenge this month, you can find it here at....


Tuesday, June 30, 2015

Mixed Media Tutorial


My Mixed Media Tutorial that is my design team project for the June Challenge over at Rhedd's Creative Spirit can be found......HERE

Monday, June 22, 2015

Picture Star!

Just a couple of Atcs I have made..using Artistic Outpost Stamps...


Using the"Picture Star" set I made 2 different Atcs...the stamps are to versatile and for anyone that know me, they will know I love Artistic Outpost Stamps.
So these are just right to enter in to the challenge over at 
If you have any of their fab stamps, why not pop over and enter their challenge.

Friday, June 19, 2015

"Sound of the Sea" Altered Domino

This is a new altered art form for me...altered Dominoes.
I've envied some beautiful altered Dominoes for quite some time now and decided recently to have a "go" at altering them for myself.
I scoured Amazon and Ebay for some genuine dominoes, well, the ones that resemble the genuine ones that is and I did find some crystalline ones which are perfect..I did try with MDF and some plastic ones,but they really don't look as good as I didn't like the squared edges or the thinness of them.
I also found the alcohol inks work a treat on the crystalline dominoes.
This is my 2nd project using them, the first I am unable to show until the 1st July as it is a design team piece for the challenge over at Rhedds Altered Spirit.
My stamp for this project is by Artistic Outpost Stamps...this and one other stamp I was very fortunate to win from their May Challenge.

So I am entering this piece in to both challenges...one because it's a game piece and the other is because I love Artistic Outpost Stamps...

               So here is my entry for the challenges over at
           Domino Art Challenge and Artistic Outpost


I used Ginger and Mermaid alcohol inks for the background, although the ginger colour was used very sparingly as I just needed a hint, as it turned out the photo really dosen't pick that colour up very well.


My new stamp,"Sound of the Sea" which I recently won from Artistic Outpost, was used for the image, I just used a section of the stamp, then again using other sections of the stamp I decorated all the sides of the domino in the shell pattern.


To finish I brushed with gloss modge podge, left it to dry overnight,then added the bale and ribbons.
So if you fancy altering a Domino or any other game piece, you can find this fab challenge here at......Dominoart
If you own any Artistic Outpost Stamps...then pop over to their fab challenge here at....Artistic Outpost

Retro Road Trip...Tag

I had my Road Trip set of stamps still lying on my work top...I'd used them for project I did a couple of weeks ago, but hadn't got around to putting them away.
Then I noticed the challenge theme over at Tagalong and my stamps were perfect for their theme "Road Trip"


I do love the Tagalong Challenges because they are just for Tags and the themes are always different, so I do like to join in whenever I can.
This set of stamps is by Artistic Outpost...I just love their stamp sets and as I said, these were spot on for the Tag challange.
The challenges run weekly, so why not pop over for a look....you can find it here at 

Tuesday, June 16, 2015

Swimsuit Girl

Isn't this stamp fun...I've had it quite sometime, in fact I have 2 of them, how that happened I have no idea, it's unusual for me to have doubled up,lol.
This Tag is for the monthly challenge over at Lost Coast's Portal to Creativity  & their Stamp Release Event


Reading the rules relating to the challenge, which have changed slightly, you can now use other stamp companies on your entry as well as Lost Coast Designs & Carmen Veranda stamps which has worked really well for my Tag's theme, which is Numbers. ( the 81 on the beach hut and the bingo numbers on the top of the tag )
I have used the Lost Coasts Swimsuit Girl stamp, isn't that quote great, it is part of the stamp.
So if you fancy a challenge, pop over to

Luckily for me,this Tag is ideal for the challenge over at  Tagalong...why not pop over for a look,there's a great challenge every week..


Monday, June 15, 2015

Sandie's (aka Rhedd) Mixed Media Canvas Tutorial

Here as promised is my Mixed Media Canvas Tutorial....it is a long post and picture heavy, but I hope you will enjoy it and take the time to leave me your comment at the end...Enjoy..x

Everyone's style is different and this is just the way I do mine...I'm not here to teach, I just wanted to share "my way" with you all.

To start  I collected all the items I needed for the first stage as you can see in the photo below. My canvas is 12"x 12", but if you have never attempted this style of mixed media on a canvas before, it would be better for you to start with a smaller canvas. I would recommend using a deep edged canvas as once they are finish they can be quite heavy, the deeper edged canvas tend to keep their shape better than the thin or cheaper ones. It is worth paying attention to that as it will be something that you will want to keep or sell.


You can use the textured or smooth Gesso, it's up to you, I actually used both. Wipes are a must to wipe your hands between stages and you will also need them when spraying your inks at the end.


I have used a genuine photo on my canvas (my godmothers wedding,from way back in the early 50's)
I used mod podge to adhere the photo to the canvas, then left it to dry overnight...of course you don't have to use a photo, you can use anything as your focal point. You can also photo copy a photo and use that rather than a genuine photo, make sure that it is completely dry before using it though otherwise the ink will smear.
The next stage was to lightly brush over the photo with mod podge, ensuring the edges of the photo get a good seal...again this was left for a while to dry completely...before adding another coat.

 (Tip....The edges of the photo must be sealed so your inks don't run underneath and cause air bubbles under the image.)


While I was waiting for the mod podge to dry, I collected the bits and pieces that I would be using on my canvas, although I did add extra bits as I went along...
Here you can see the lace,beads button,flowers,pegs,all sorts of stuff, including bits of jewellery.

(Tip.... if you use any metal items that may be prone to rust, then give them one or two coats of mod podge to seal them.)


Here I have started to add the scrim/cheesecloth, using mod podge, then added some chicken wire shaped grey board.


As you can see by the photo above, I have now added some lace and trims...I actually used my hot glue gun to adhere them to the canvas and then dabbed over it all with mod podge,


Now it's time to add all the treasures, this is such a fun part....you can use a strong glue of your choice to keep the pieces in place,or like me use hot glue.The pieces must be secure and not wobble about.

( Tip....personally I try to keep my pieces mainly horizontal or vertical as too many curves can make the finished canvas look untidy )


As you can see I have added more pieces to my canvas, I wasn't happy with the large paper clip that I had on the left side,so removed it at this point.

(Tip....I left my canvas on an easel in my lounge for a few days, this way I can see if I needed to add anything else...or remove any pieces.)


Now I am completely happy with all the elements on my canvas, I gave it a coat of  gesso, making sure I got in to all the small areas where items have been glued.....I also used some of the textured gesso and stippled it in some areas.
I left it to dry overnight, then gave it another 2 coats of smooth gesso,making sure it was dry between coats.


I chose Silver and Raspberry Cosmic Shimmer Mist sprays and I also mixed up some Mica Powder in Mustard Gold for the main colours for my canvas. I also used  Artiste Spritzing Ink in White, it has a gorgeous shimmer to it and covers a bit better than the white shimmermist.


I scrunched up 2 baby wipes and covered my photo, these sprays do tend to go everywhere.


I sprayed from the top right down to the bottom left  and then sprayed the opposing corners in the mustard gold. I did use a heat tool to help with the drying, please be careful not to get too close as the gesso under the spray inks can bubble and blister.
I then resprayed the same areas....once dry I did spray for a third time.
Again once dry I added the silver spray to the corners, note the corners where the Raspberry colour is has now gone a lovely mauve shade, while the gold/green corners have gone silvery grey.

(Tip...drying between 2 different colour sprays,stops them from muddying)

(Tip....you will need to change the wipes covering the photo as they will have got quite inky...if you find any colour on your image,you can remove it with a clean wet wipe, the wipe won't affect your photo as it has been sealed with the mod podge.)


Leaving my canvas overnight to allow the inks to finish drying, some areas like under the flowers etc tend to stay a little damp even after using a heat gun....I then covered the photo with wipes and went all over the canvas with the Artiste White Spritzing Ink...I laid the canvas flat to dry for a couple of hours.
The edges of the canvas can be painted, or inked,the choice is yours...I dabbed mine with a sponge soaked in the same inks that I used for the front.


( click on the photo to enlarge it )
(Tip... to finish you can highlight areas with gilding wax,which I haven't done on this one,but have done on other canvas's that I've done.)

So here we are, my finished canvas, sorry about the background view, it was such a bright day that the light in my kitchen was better for the photo...
I hope you enjoyed my tutorial and I am so pleased you read through to the end...

Don't forget we still have 2 weeks left in our June Challenge...which you can find here at