Followers

Thursday, December 24, 2015

Merry Christmas Everyone.....

I've really not had much time  to craft throughout December, hopefully 2016 I will be back on form...
So to all my Followers and friends that look in to my blog, I want to Wish You All a Wonderful Christmas...hope you all have a fabulous time and that Santa will be good to you all...xxx


            See you all again on the 1st January 2016

Tuesday, December 1, 2015

December Already....

So here we are...the Festive Season is finally here, comes around so quickly dosen't it,lol.
Over at Rhedd's Creative Spirit there is no December Challenge....I wanted to give my fabulous design team the whole month off so they can prepare for christmas...however they and myself will be back on 1st January 2016 with our first challenge of the year...so please mark the date on your calender to remind you to drop by the blog.
In the meantime in the December's Post we have our winner for November and chosen by the team, just a small selection of stand out entries from 2015...so well worth popping over for a look.
                         Rhedd's Creative Spirit

Last Challenge until February

Altered Eclectics are running their December Challenge through to 1st February 2016, so the design team will be having a nice break...so Thank You to our Boss Lady Elaine.
For Decembers Challenge I have altered a rubber stamp block...I take most of my stamps of their blocks as the wood eventually warps anyway, no matter how you store them....


I used a smallish block,measuring 2.5 inches x 3.5 inches 

I paint the block in light brown acrylic paint twice and once dry scrubbed over it with gesso.
Then I stamped the script over every side of the block.


I had this image of this adorable little girl in my stash, so I trimmed around her and adhered her to the block...using fabric flowers, beads and a piece of broken jewellery I framed her face and shoulders.


The bottom of the block I used some gorgeous beaded trim. I found a key in my stash and also a short piece of chain with the charm on the end...it was just perfect for the end of the key.


To finish I added the disc and ring to the top so it can be hung almost anywhere....I am thankful my daughter dosen't read my blog as this piece was made for her as a stocking filler...
Do pop over and join in with Decembers through to Februarys Challenge over at
                                 Altered Eclectics

Tuesday, November 24, 2015

You're a Keeper

I have made a card as my entry for one of my favourite stamp companies and challenge blog....Artistic Outpost.....a little unusual for me as I don't really make many cards any more, I am more in to altered art.
I was so fortunate to be a winner last month,but that won't stop me from entering future challenges....I am so looking forward to receiving my prize very soon.
So here is my card...nice and bright and sunny, just what was needed on such a dull overcast day...


I have used the "You're a Keeper" set for this card, using the fish and fishing fly to make a background.
I stamped and mounted up two of the images and layered one over a strip of hessian....then I  stamped and mounted the words and added them to my card...also adding a small piece of hessian under the word "keeper"


I stamped the ruler on some previously coloured card and I also stamped out the fishing fly on some cream card...for effect I trimmed the image of the fly down and added  a piece of dark brown feather.

               You can find the challenge over here at
              Artistic Outpost/November Challenge

Friday, November 20, 2015

Digi Art.....

Unfortunately I missed the 2nd Cheeky Challenge over at Dezinaworld last week....so this week I made sure I created something on time....
June posts a prompt and we create whatever we want from that prompt....either physically or digitally....so this gives me a chance to have a play digitally with my photos and images... this is what I created.


The graveyard image is a real photo that I was fortunate to acquire from a friend and the lady was sourced some years ago, which I have kept on file because she is just stunning....
So this is my entry for the challenge, hope you like it...
Why not pop over for a look...maybe join in the challenge...you can find it here at
                                    Dezinaworld
I am also entering this in to the challenge over at Dream in Darkness....which you can find here
Dream in Darkness

Saturday, November 14, 2015

Seasonal Tag

Just a quick post to share this Tag I made for my group event on Facebook....


I used a dark brown tag that I layered up with some scraps of fabrics...I then heat embossed the arch with gold embossing powder. The image was a free one that I downloaded and printed on satin photo paper, which I then cut to fit the arch.


I then added the arch to the tag and wrapped some twine around the lower part...also added the reindeer at the same time.
I found the flower and the copper centre piece with scrolled wires in my stash and it just looked so nice on top of the flower.
Finally I dabbed around the tag with snow affect texture paste, leaving it to dry over night...have to admit this has become one of my favourite tags...hope you like it too.

Thursday, November 5, 2015

Cheeky Challenge at Dezinaworld

My dear friend June has set a "Cheeky Challenge" over on her blog....the challenge was to do something with this picture...in whatever way you like.


I love this picture, so had a play tonight using my Serif Craft Artist...I'm not much of a digi artist to be fair....

                          This was my first attempt


I wasn't that happy with the result....think it was the busy background....so I had another play....
               
                                My second attempt


For this one I added a basket, letters and added and rearranged the bottles and the word Dream.

So if you like to play digitally why not pop over to Junes blog and grab the photo...you can find her blog here at.....
                             Dezinaworld


Sunday, November 1, 2015

A Seasonal Box Bag

It's time for the November challenge over at Rhedd's Creative Spirit as always the theme is anything goes, recycled,mixed media,altered art only......strictly no papercrafts


My design team project for the November Challenge was to altered this wooden box bag....I had bought a set of two and I fell in love with them....this is the larger of the bags.


The wood was a tad rough around the edges,so I removed the handles and then sanded it all over before sealing with gesso.
I covered all sides of the bag with christmas themed music paper, and distressed all the edges with walnut stain ink.


I dabbed glittery texture paste all over the bag and set it aside to dry....in the mean time I created the topper using this fabulous stamp from Artistic Oupost...
I stamped the image then matted it on some dark brown card...
I still had some scraps of vintage cotton lace from an old collar and used that along with some muslin, burlap and silver mesh.
I also gessoed and then added the glittery texture paste to  the mdf word "Joy" 


To finish the box bag I added all the elements, then the ribbon handles, tying some silver mesh as a bow to one side....
So do pop over to Rhedd's Creative Spirit if you fancy an altered art/mixed media challenge, or just to look at the design team creations...they are well worth a visit.


An Old Lid

Many months ago,my friend found an old box lid in her mum's garage...knowing how I collect "bits" that might come in useful,she dropped the said box lid in to me on her way home...and now finally I have altered it for my design team project over at Altered Eclectics


The lid measures 9"x 5" (23.5 x 13.5 cms)
I decided to leave the lid exactly as it was and not paint over the original design because I wanted to keep the look of it, it has a lovely patina.

I made the lid in to a lovely Vintage Wall Hanging for my bedroom....


I started by glueing burlap, muslin and lace to the lid with hot glue...then added the gorgeous lace butterfly.
In my stash I had a selection of doilies and very old vintage lace which I also glued to the lid...adding a few buttons and the beads and a stick pins.


The image is a Tim Holtz card that I trimmed and mounted on cream card, cutting around the edges with deckle scissors and distressing with walnut ink to age it. I added a couple of metal corners to the photo for effect.


The doiley looked a little bare so I added a couple of keys.....the pretty flower on the butterfly and the flower on the photo actually belonged to my lovely mother, the larger flower is a brooch, I took the back off and the flower on the butterfly is one of the matching earrings.


To finish I added the hanging wire, fortunately there were holes at each end and were just perfect for the wire to go through...I found a piece of ribbon that was the right colour and added that to one end of the wire.
I couldn't resist using the PaperArtsy "Femme Fatales" stamp...lol 
Hope you like this, I love it and I have it hanging on the handle on my wardrobe....

Do pop over to Altered Eclectics for their current challenge....


Tuesday, October 27, 2015

Hello Punkin.....

I was tidying away my craft table tonight and I had a couple of sets of Artistic Outpost Stamps sets that were over to one side...so I decided to rustle up a Tag for a second entry in to the challenge over at Artistic Outpost and also for the Halloween theme over at That's Crafty 


This is an Mdf Tag and is nice and chunky...so I covered the front with texture paste and dried that with my heat tool, the paste crackled up nicely.
Then I dabbed Rusty Hinge distress ink over the tag, adding Spiced Marmalade around the edges...I then heat dried the inks.
Using the Vintage Halloween Stamps from Artistic Outpost I stamped, coloured and cut out the pumpkins, the little witch and the words. The words were then cut individually and mounted on black card.
I set all that aside and using the fence and the tree stamp I stamped directly on to the Tag.


I then added all the elements to the Tag...I love the effect of the texture paste, I was careful not to spread it on too thickly as I only wanted slight texturing and crackle.
To finish I added some frosted lace stickles on the hat, cloak, broom and the pumpkins....
You still have time to enter the challenges over here at....

                 Artistic Outpost/October Challenge

                      That's Crafty / Halloween

Monday, October 26, 2015

Colours of Autumn....

I've actually made a "Card" for three challenges, I usually try to enter a few each month, but due to other commitments I have just haven't had the time this month.


Over at Artistic Outpost the theme is Anything Goes.
 For Rubber Dance Stamps the theme is a choice of using 3 colours...Tree Bark, Falling Leaves and Pumpkin...or....Autumn
Over at Craft Stamper you have to use a Technique as well as some stamping

So for the Artistic Outpost Challenge I have used their lovely set of stamps called "The Outpost" they just scream Autumn to me....

For the Rubber Dance Stamps Challenge I initially designed the card for the Autumn theme, but realised I have actually captured the colours as well, so I am pleased with that.


Over at Craft Stamper there are several techniques to choose from, I chose Ink which I have used for my backgrounds and I have also used stamping, which is also required for their challenge.

  You can find  challenges that I have entered this card in to at....

                  Artistic Outpost/October Challenge


Thursday, October 15, 2015

Over on the Darkside...again

Just a digital creation I rustled up for the challenge over at ...Dream in Darkness


This a a little creepy compared to some of my digi creations...but as we are in the month of October where anything spooky and downright wierd can happen I thought this would fit in perfectly.
The tree image is a photo given to me by a dear friend and the Skull image I sourced from the public domain.
The script I sourced from Google under Gothic Verses...this one seemed to suit the best out of all the ones I read through...sadly I can't give credit to the author as they are "unknown"
Dream in Darkness is a "Dark Challenge Blog and are running the 31 days of Halloween, so if it's to your taste why not pop over for a look....

Friday, October 9, 2015

A Little Halloween Tag...

9 days in to October and this is all I've managed to do....I do have things "in progress" but I seem to be working so slow recently. I know we all lose our drive sometimes,but mine seems on a permanent go slow!

I cut 2 Tags from a die, one in orange card,the other in backing paper and glued both together.
Then added the image which is a free image,in fact I came across it by chance in one of my folders, I remember printing off some Halloween freebie images about a year ago.
I added the clock,cut from another piece of backing paper (G45)...also the die cut bat and cat, I used tiny rhinestones for the eyes for both of them.
To finish I added glossy accents to highlight the girls dress, the bow in her hair and the features on the pumpkin,but the photo hasn't picked that up....

Thursday, October 1, 2015

Spells and Potions.....

October...the month where spooky, scary and downright frightening things happen....so for my design team piece this month over at Rhedd's Creative Spirit I have created a double shrine style box containing all sorts of spells and potions....


I sealed the wood with black gesso,then added some texture paste to roughen the look,once dry I painted it with black acrylic paint...once completely dry I used pewter gilding wax to highlight the roughened areas.


I lined the left side with some scrap paper and added the clock and the ghost...then made up some "poisons" all glued in place.
I used some stringy bits of hot glue to create some cobwebs.


For the right side I made some spell books and another bottle of poison, added a ball of eye balls, the skull and the web and spider.....spooky or what,lol...


Finally I added a few wooden pumpkins....

You can find the challenge here over at


Little Sewing Boxes

Over at Altered Eclectics their October Challenge is now under way...so get your crafty head on and pop over for a lookie and maybe enter the challenge...
As part of Elaine's ( The Boss Lady) design team I have created a couple of very special little boxes for your inspiration...although well over a week ago I had nothing in my head but empty space, nothing was moving in there at all...then a couple of days ago I felt creative...so rushed off to my craft room...
Here are the 2 little boxes....they are Mdf match boxes that are available over at Fernli Designs.


After assembling the boxes, which are very easy to do, I created my own backing paper using Oxford Impressions Stamps...I covered all sides and the fronts of the drawers.


I then added handles to the drawers....and started to decorate the tops of the boxes.
For the larger box I used the advertising stamp and for the smaller box I used the fabulous Gibson girl stamp as she is sat sewing.


From my stash I dressed a small dress-form and found some old wooden buttons and attached them to the boxes with an assortment of materials and some really old lace from a cotton doily. I also added some pearl pins.
I also found a couple of thimbles and some thread to go in the little drawers, along with some labels I made.


I so love these little boxes and I will be keeping them for myself...so I must dash and hide them from my daughter,lol


You can find October's Challenge here at....


Tuesday, September 22, 2015

Textured Tag....

I've not done much in the way of crafting these last couple of weeks, usually try to get ahead but it just isn't happening...so earlier today I decided to get my craft photos sorted on my laptop.
 I was shocked to find I hadn't entered the Tag I made for Rubber Dance Stamp Challenge....I really thought I had posted it a week or so ago...how bad is that!


The theme this month is to use a set of 3 colours from the other challenges this year...I have chosen June 2015.
The alternative theme was Celebration...but I much preferred the colour challenge.


I took a nice thick MDF tag and went over it with white gesso, once dry I added crackle texture past.
I used a hear tool to gently dry the paste and it quickly formed it's crackle.
I then used a palette knife and swiped my 3 colours across the Tag, also gently drying them with the heat tool.
I stamped an image for Rubber Dance Stamps on some card and roughly coloured it...I fixed that to the tag on some hessian, then added some drift wood, rope and some stamped shells which I coloured and cut out.
You can find this lovely challenge here at 
               Rubber Dance Stamps.

Tuesday, September 15, 2015

She Watches.....

After sorting through some of my digi images I decided I would enter the challenge over at
Dream in Darkness.....to date I have entered every one of their challenges since they started 5 mths ago...and so far I have achieved 2nd place twice...so I must be doing something right,lol...


This is among one of my favourite digital pictures that I have created, for this I have used a public domain image of the little girl and one of my own photos.
The sentiment I also created myself....
I kind of like the haunting style of my creations and I do enjoy creating them when time allows...
So if you fancy a "Dark" challenge,why not pop over to....Dream in Darkness

Monday, September 14, 2015

Halloween Treats....

It's the early hours of the morning and I just can't sleep...then I remembered I haven't yet posted my Tag for the Tagalong Challenge and the challenge over at Artistic Outpost!
So here it is....

The theme over at Tagalong is to have something over lapping the actual Tag...there is no theme at Artistic Outpost, but you must use their products....so I pulled out my new set of Artistic Outpost Stamps called Halloween Treats...
This Tag is for two challenges which you can find here...


Sunday, September 6, 2015

The Tag...

I do, when time allows, love to join in with a few challenges each month. I never expect to win, as the saying goes, it's the taking part that counts, so when I have won or had a special mention it means a lot to me.
This week I have made a Tag, this is for both the challenges over at Artistic Outpost and Tagalong


As always over at Artistic Outpost you can create anything you wish, so long as you use their products.


Over at Tagalong the remit for their challenge is "Crackle", any form is acceptable, so I have used my crackle stamp to create the background base of the tag.

This Tag is my entry for the challenges here at....


Tuesday, September 1, 2015

No Mouse Here....

Time flies when you are having fun....well fun I had altering this Mouse Trap as my project for the challenge over at Rhedd's Creative Spirit
I have seen some gorgeous altered mouse traps over on Pinterest, so decided to have a go myself.
This was  my 4th attempt...and my 4th mouse trap!


The tutorials on You Tube all show ( well the ones I watched did ) that you have to remove the wires on the trap...which I did easily to be fair...the drawback was putting it all back together again, ok some bits don't really have to go back, but tapping back the bits I needed caused the cheap wooden base to split, then I had one where I couldn't  re-attach the piece that holds the main spring in place because the end of the u-nail piece was blunt and didn't go back correctly....so in the end (at this point I was slowly losing the will to live,lol ) on the last trap I left most pieces in place and worked around them...and this is the result


I painted the trap in dark brown acrylic painted,then decorated it using the designer papers from Graphic45.
Would love to see you enter my challenge...you can find it here at
                              Rhedd's Creative Spirit


Sweet Hearts....

September already....where did the rest of the year go, lol.
Over at Altered Eclectics they have launched their challenge for September...as always it is only for Altered Art & Mixed Media definately no Papercrafts.
My project this month was to use up some small solid wood cubes and some mdf hearts....( the hearts are from Fernli Designs)


The cubes measure 4.5cms and the hearts are 5cms across....these have been hanging around in my craft room for ages...so I decided to make use of them.


I covered the cubes and added an extra cut out image and word, then distressing the edges with frayed burlap distress ink.


I added glossy accents to the word and images on the cubes...unfortunately the photo dsoen't show this too well.


After covering the hearts with designer papers, I distressed the edges,the same as the cubes and added embellishments.
The words were then added and they were the covered with glossy accents...which do show slightly in this image.
To attach the hearts I made a hole in each cube with my bradawl.
 Using kebab sticks,I hot glued the hearts to the sticks,then pushed them in to the cubes....
These are now on my dressing table and I am pleased with how they look...
Hope to see you over at the challenge,which you can find here...


Wednesday, August 26, 2015

Huckleberry Finn Coasters

I was given some old coasters last year, about 12 square ones and 6 round ones. I put them away and totally forgot about them until yesterday, when I found them while looking for something else.
I took 4 of the round ones and decided to recycle them in to new coasters for my craft room.


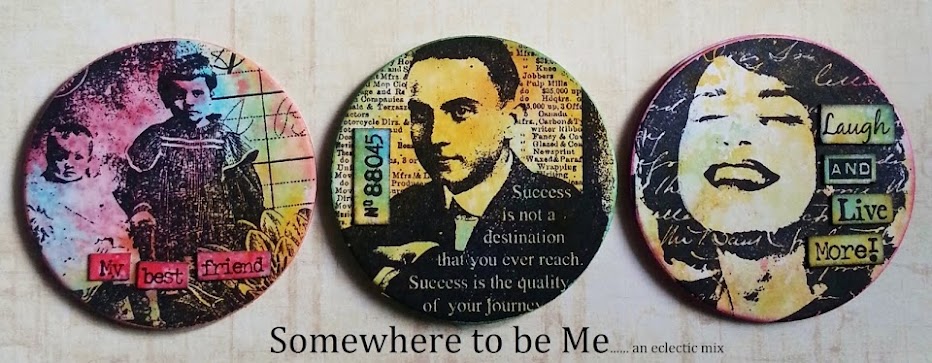
I lightly sanded them down, glued on some strips of book paper then painted them with gesso. When they were dry, I splodged on some red and blue acrylic paint and kind of smudged it about with a baby wipe. Once that was completely dry, I gave them another light coat of gesso.
At this point the picture in my mind's eye of how these coasters would look completely changed...we've all had that, haven't we?
It was while I was waiting for the paint to dry,that I was looking through all my Artistic Outpost Stamps...keeping the Huckleberry Finn set to one side, with the idea that I would stamp my coasters with them.
This is where I hit a snag, the strips of book paper had caused slight ridges on the surface of the coasters, so I wasn't sure I would be able to stamp a clear enough image...but quickly decided to go for it anyway and take a chance.
All the images stamped pretty well, some parts I coloured with water colour pencils, then I sprayed all 4 coasters with seal and shine, I didn't want to disturb the pencil colours with the moisture from mod podge.

(click image to enlarge it)

Once the spray and shine was completely dry I realised that I would need a thicker coating on the surface, so I decided I would heat emboss with clear embossing powder.

(click image to enlarge it)

As I was heat embossing the coasters, I could still see the ridges from the paper, but I thought it added interest to the coaster, overall I love the look of  them as they now look like round shiny tiles!

(click image to enlarge it)

I heat embossed each coaster twice,then set aside some embossing powder and added a light sprinkle of very fine glitter....then using that I heat embossed them for the third time.
This set of coasters I am using to enter the challenge over at